Sending Emails Using Node-RED
- 15 May 2025
- Print
- PDF
Sending Emails Using Node-RED
- Updated on 15 May 2025
- Print
- PDF
Article summary
Did you find this summary helpful?
Thank you for your feedback!
This guide walks you through configuring Node-RED to send automated emails. By the end, you'll be able to trigger email notifications from your OV20i camera or other systems.
Overview
Node-RED's email capabilities allow you to send automated notifications, alerts, and reports from your industrial systems. By connecting email functionality to your OV20i camera, you can receive notifications about detection results, system status, or errors without constant monitoring.
Important
Version 1.0 of this document currently supports Gmail only. We are working on providing the steps for Microsoft Outlook integration.
Prerequisites
Before you begin, ensure you have:
- Node-RED installed and running
- A Gmail account to use as the sender
- App password generated for your Gmail account (standard passwords won't work)
- Basic understanding of Node-RED flows
Important
For security reasons, Google requires using app passwords instead of your regular account password. This is a one-time setup process.
Download
You may need to download the "node-red-node-email" template from Node-RED if the email nodes are not already installed on the camera.
Creating a Gmail App Password
1. Enable 2-Step Verification
- Sign in to your Google Account
- Go to your Google Account settings
- Select Security from the left menu
- Under "Signing in to Google," select 2-Step Verification
- Follow the prompts to turn on 2-Step Verification
2. Generate an App Password
- After enabling 2-Step Verification, go back to the Security page
- Select App passwords (under "Signing in to Google")
- Select Mail as the app and Other as the device
- Enter a name (e.g., "Node-RED Email")
- Click Generate
- Google will display a 16-character app password
- Copy this password and store it securely – you'll need it for Node-RED
Note
This 16-character password will only be shown once. If you lose it, you'll need to generate a new one.
Setting Up the Email Flow
1. Create the Basic Flow
- Open your Node-RED editor in a web browser
- Drag an inject node from the palette to your workspace
- Drag an email node from the output section of the palette
- Connect the inject node to the email node

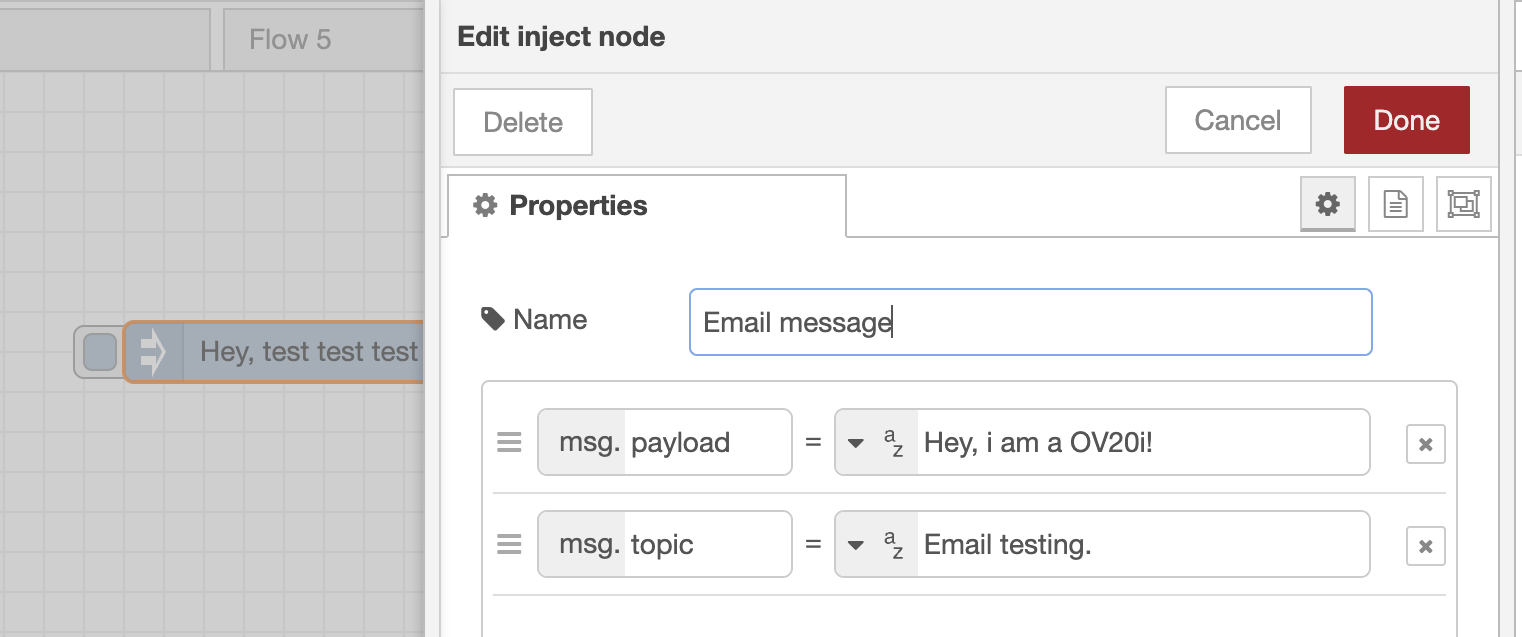
2. Configure the Inject Node
- Double-click the inject node to open its properties
- Set a meaningful name (e.g., "Email Trigger")
- Configure the payload to contain your email content:
- Set Payload type to "string"
- Enter your email body text
- Configure the topic to be your email subject:
- Add a property named "topic"
- Set its value to your desired email subject
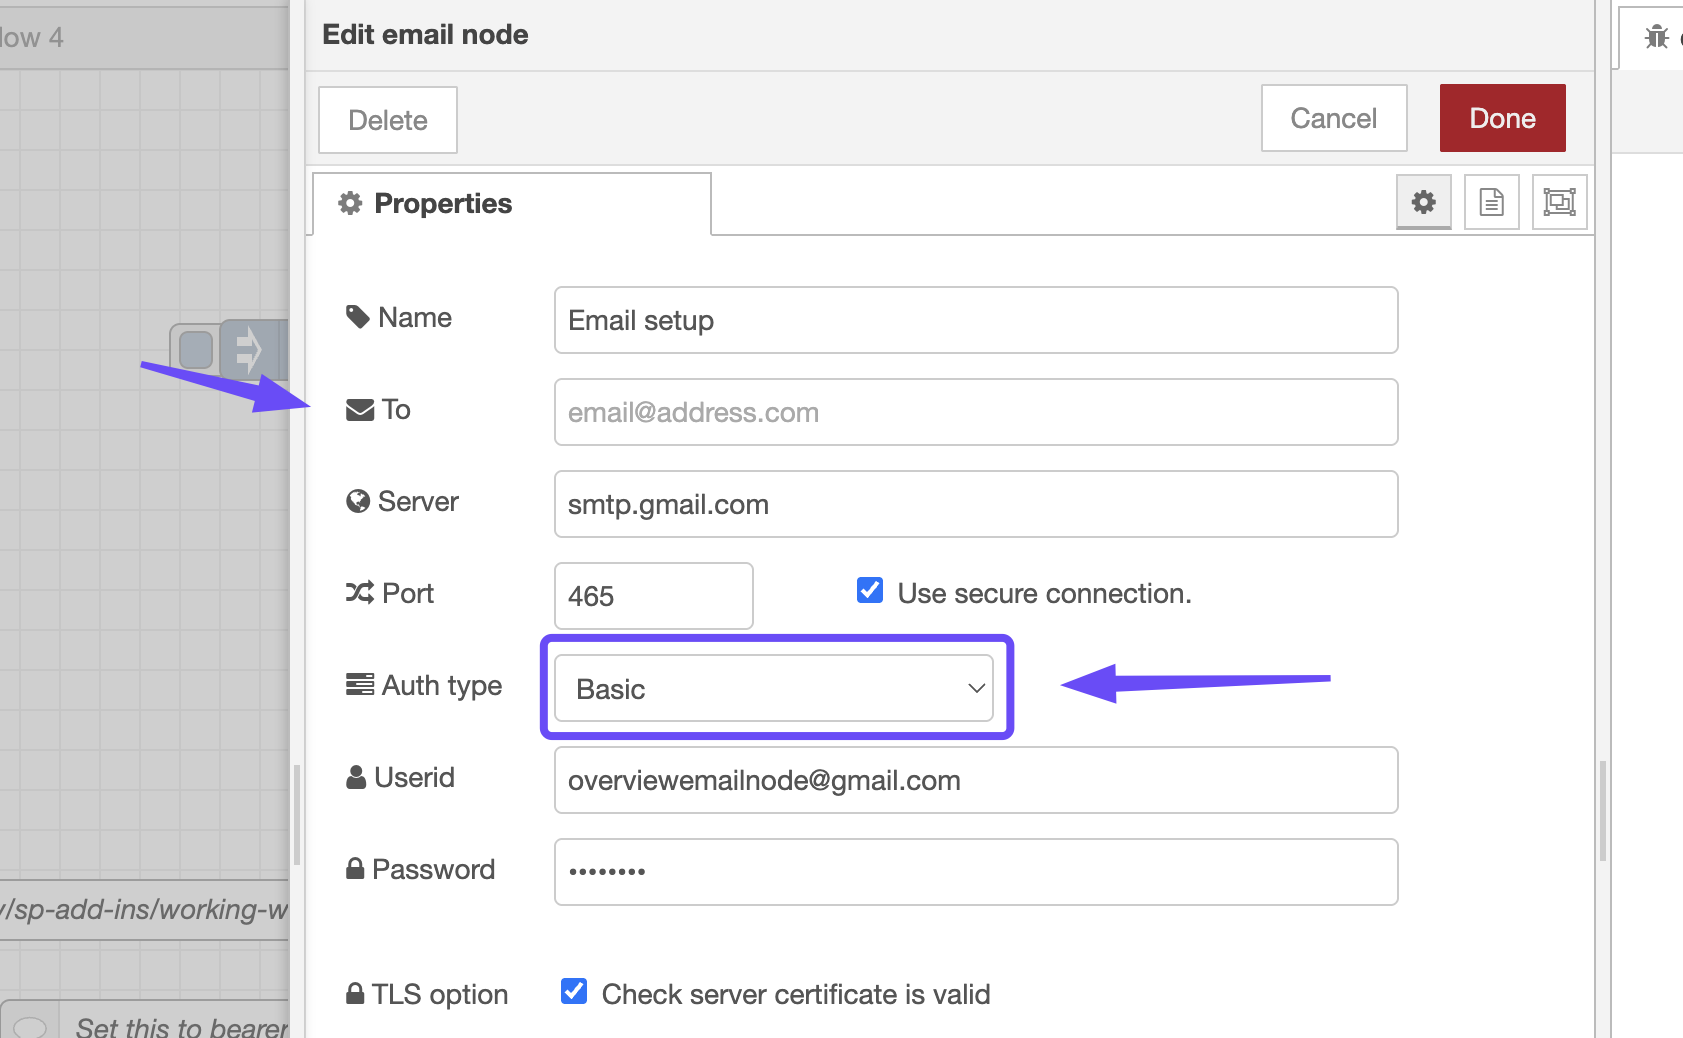
3. Configure the Email Node
- Double-click the email node to open its properties
- Enter the following settings:
- Name: Descriptive name for the node
- To: Recipient email address
- Server: smtp.gmail.com
- Port: 465
- Check Use secure connection
- Auth type: Basic
- Userid: Your full Gmail address
- Password: The 16-character app password you generated earlier
- Check "Check server certificate is valid"
- Click "Done" to save the configuration
- Deploy your flow by clicking the Deploy button
Testing and Verification
- Click the button on the left side of the inject node
- Check the debug panel for any error messages
- Verify that the email was received at the destination address
Note
If you don't see the email immediately, check your spam folder as automated emails may sometimes be filtered.
Complete Flow Example
For reference, here's the complete flow JSON that you can import into node-RED:
[
    {
        "id": "ef9235fbfbe42254",
        "type": "e-mail",
        "z": "0931aa6716e829f0",
        "server": "smtp.gmail.com",
        "port": "465",
        "authtype": "BASIC",
        "saslformat": true,
        "token": "oauth2Response.access_token",
        "secure": true,
        "tls": true,
        "name": "",
        "dname": "Test Email",
        "x": 870,
        "y": 140,
        "wires": []
    },
    {
        "id": "e3439dddd299c8d7",
        "type": "inject",
        "z": "0931aa6716e829f0",
        "name": "",
        "props": [
            {
                "p": "payload"
            },
            {
                "p": "topic",
                "vt": "str"
            }
        ],
        "repeat": "",
        "crontab": "",
        "once": false,
        "onceDelay": 0.1,
        "topic": "Email testing. ",
        "payload": "Hey, im a OV20i! ",
        "payloadType": "str",
        "x": 650,
        "y": 140,
        "wires": [
            [
                "ef9235fbfbe42254"
            ]
        ]
    }
]
Was this article helpful?